Emulate a slow block device with dm-delay

When debugging a problem caused by high I/O latency on Linux, it may be interesting to emulate a slow or congested block device. The device mapper driver which manages logical volumes on Linux has a solution for that: the dm-delay target.

In this article, we will use the dm-delay target to delay reads and writes to a block device. We will first create a ramdisk which is an extremely fast block device. Then, we will stack the dm-delay target on top of it and measure the I/O latency it introduces.

Creating a ramdisk

A ramdisk is a RAM backed disk. Since data written to RAM do not persist without power, do not store real data on a ramdisk. Compared to a hard disk drive, a ramdisk is much smaller in size: its size cannot exceed the computer RAM size. But a ramdisk is much faster than a hard disk drive.

On Linux, loading the brd kernel module creates a set of ramdisks. Passing arguments to the modprobe command configures the number of ramdisks and their size:

  • rd_nr sets the maximum number of ramdisks.
  • rd_size sets the size of each ramdisk in KiB.

The command below creates a 1 GB ramdisk:

$ sudo modprobe brd rd_nr=1 rd_size=1048576
$ ls -l /dev/ram0
brw-rw---- 1 root disk 1, 0 Aug 24 20:00 /dev/ram0
$ sudo blockdev --getsize /dev/ram0 # Display the size in 512-byte sectors
2097152

Creating a delayed target with dm-delay

The kernel documentation explains how to configure a delayed target with dmsetup. For instance, you can use a script like this one to stack a delayed block device on top of a given block device:

#!/bin/sh
# Create a block device that delays reads for 500 ms
size=$(blockdev --getsize $1) # Size in 512-bytes sectors
echo "0 $size delay $1 0 500" | dmsetup create delayed

Checking the latency of dm-delay

Let's check the latency introduced by dm-delay. We use fio to compare the latency of the ramdisk (/dev/ram0) with the latency of the delayed device (/dev/dm-0). The job file for fio that describes the I/O workload is as follows:

[random]
# Perform 4K random reads for 10 seconds using direct I/Os
filename=/dev/dm-0
readwrite=randread
blocksize=4k
ioengine=sync
direct=1
time_based=1
runtime=10

At the end of the run, fio displays a bunch of statistics. One of them is the completion latency (denoted as clat):

  • ramdisk: 1.33 µs
  • delayed block device: 499735.14 µs

The latency of the ramdisk is a few microseconds whereas the latency of the delayed block device backed by the ramdisk is close to the 500 ms delay we requested.

A similar experiment for writes shows that dm-delay also delays writes to the device. To delay writes with dm-delay, give a second set of parameters to dmsetup:

#!/bin/sh
# Create a block device that delays reads for 500 ms and writes for 300 ms
size=$(blockdev --getsize $1) # Size in 512-bytes sectors
echo "0 $size delay $1 0 500 $1 0 300" | dmsetup create delayed

Suspending I/Os

The device mapper can also be requested to suspend and resume I/Os.

$ sudo dmsetup suspend /dev/dm-0
$ sudo dmsetup resume  /dev/dm-0

Send F10 to GRUB with Minicom

I recently had to modify the kernel command-line of a machine that I accessed with a serial console. GRUB displayed the following message explaining that I had to "press Ctrl-x or F10 to boot".

Minimum Emacs-like screen editing is supported. TAB lists
completions. Press Ctrl-x or F10 to boot, Ctrl-c or F2 for
a command-line or ESC to discard edits and return to the GRUB menu.

Unfortunately, pressing F10 in minicom was equivalent to hitting ESC: my changes were discarded and I was sent back to the GRUB menu.

It turns out that the following keystroke sequences allow to send F10 with minicom: ESC+O+Y or ESC+0.

Send desktop notifications with cron

At work, I tend to check my mailbox too often. That's unnecessary. As an experiment, I have decided to check it once every hour. Since I don't want to spend "brain cycles" remembering when I should check my mailbox, I have added a cron task to display a notification every hour.

Desktop notifications on Linux can be displayed with a command-line utility named notify-send:

$ notify-send "Hi ${USER}!" "it's time to check your email." --icon=dialog-information

The notification is displayed by the notification server which is either part of your desktop environment or standalone. I personally use dunst because my window manager, i3, has no built-in notification server.

However, when notify-send is invoked by cron, nothing is displayed. The script invoked by cron cannot communicate with the desktop environment because the DBUS_SESSION_BUS_ADDRESS variable is not set.

As a consequence, you have to retrieve the value of the DBUS_SESSION_BUS_ADDRESS for your session. You can do that by parsing the /proc/$PID/environ pseudo file of your window manager (i3 in my case):

$ grep -z DBUS_SESSION_BUS_ADDRESS /proc/$(pidof i3)/environ | cut -d= -f2-
unix:abstract=/tmp/dbus-ajRnZ5v7g9,guid=f8761603e1845a282e104e1a5515bcec

I wrote the following shell script named remind-email to grab the bus address of the D-Bus session and display a desktop notification:

#!/bin/sh

export DBUS_SESSION_BUS_ADDRESS=$(grep -z DBUS_SESSION_BUS_ADDRESS /proc/$(pidof i3)/environ | cut -d= -f2-)
notify-send "Hi ${LOGNAME}!" "it's time to check your email." --icon=dialog-information

The script is invoked every hour by the following cron entry (use crontab -e to edit your cron tables):

0 * * * * /home/foo/bin/remind-email

Notifications with file descriptors

Linux is known for its "everything is a file" mantra inherited from Unix. A wide range of system resources are represented by files. Thus, in programs, system resources are managed as file descriptors with a common set of primitives such as read(), write() or close().

Along with files, block devices, sockets or pipes, Linux also provides a way to manage some notifications with file descriptors. For instance, a program can listen to events like "a file was created in a directory" or "a timer has expired" with file descriptors.

This article discusses several Linux file descriptor based notification mechanisms: inotify, timerfd or signalfd and a way to combine them: epoll.

Common usage

The file descriptor is returned by an init function. Most of the time, the last function argument is called flags and can be used to change the behaviour. Setting the flags to 0 selects the default behaviour, but other flags can be combined with a bitwise OR.

A new file descriptor is returned if the initialization is successful. Otherwise, the function returns -1 and sets the errno variable.

#include <sys/timerfd.h>

int fd = timerfd_create(CLOCK_MONOTONIC, TFD_NONBLOCK | TFD_CLOEXEC);
if (fd == -1) {
    /* timerfd_create() failed; check errno for details. */
}

The notifications can be read from the file descriptor with the read() system call. The data returned by read() contain information about the notification. The format of these data depends on the kind of notification.

Timer notification with timerfd

A "file descriptor timer" is created with timerfd_create(). After 
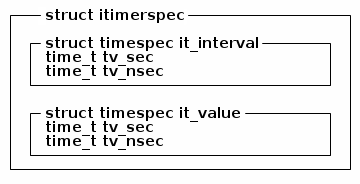
the timer is created, it can be started with timerfd_settime(). The timer properties are set using a struct itimerspec variable that describes the interval and initial expiration for the timer. Here is the layout of struct itimerspec:

struct itimerspec layout

Calling read() on the timer file descriptor waits for the timer to expire. The buffer provided to read() is an uint64_t integer that read() fills with the count of timer expirations that occurred since the last read().

The following program shows timerfd in action:

/* This program prints "Beep!" every second with timerfd. */
#include <inttypes.h>
#include <stdio.h>
#include <sys/timerfd.h>
#include <unistd.h>

int main(void)
{
    int fd;
    struct itimerspec timer = {
        .it_interval = {1, 0},  /* 1 second */
        .it_value    = {1, 0},
    };
    uint64_t count;

    /* No error checking! */
    fd = timerfd_create(CLOCK_MONOTONIC, 0);
    timerfd_settime(fd, 0, &timer, NULL);

    for (;;) {
        read(fd, &count, sizeof(count));
        printf("Beep!\n");
    }

    return 0;
}

Signal notification with signalfd

The traditional way to handle a signal on Linux is to create a signal handler with signal() or sigaction(). When a signal is received, the program is interrupted: one of its thread is stopped and the signal handler function is invoked.

With signalfd(), no signal handler is invoked when a signal is received. Instead, the signal notification is read from the corresponding file descriptor.

Unlike the timerfd API, the signalfd API provides a single function to create and change a signal file descriptor:.

int signalfd(int fd, const sigset_t *mask, int flags);
  • Set fd to -1 to make signalfd() create and return a new file descriptor.
  • Set fd to an existing file descriptor to change it.

The signal mask is built with macros like sigemptyset() or sigaddset(). Moreover, it is important to invoke sigprocmask() with SIG_BLOCK to block the default signal handler.

When a signal is received, read() fills one or more signalfd_siginfo structures with information about the signal.

/* This program waits for signals and print their signal number */
/* Send `kill -9` to stop this program. */
#include <signal.h>
#include <sys/signalfd.h>
#include <stdio.h>
#include <unistd.h>

int main(void)
{
    int fd;
    sigset_t sigmask;
    struct signalfd_siginfo siginfo;

    /* No error checking! */
    sigfillset(&sigmask);
    sigprocmask(SIG_BLOCK, &sigmask, NULL);
    fd = signalfd(-1, &sigmask, 0);
    for (;;) {
        read(fd, &siginfo, sizeof(siginfo));
        printf("Received signal number %d\n", siginfo.ssi_signo);
    }
    close(fd);

    return 0;
}

File system notification with inotify

Compared to signalfd and timerfd, inotify is older. It is also more complex, mostly because dealing with file system events is difficult. In my opinion, using inotify correctly is tedious but there is no better alternative to get file system notifications on Linux right now.

The inotify API provides several functions that must be combined to watch file system events. A "inotify file descriptor" is called an "inotify instance". Associated with an inotify instance is a list of directories or files to watch called "the watch list". Maintaining the watch list as files and directories change is the most difficult part.

inotify_init() creates an inotify instance:

int inotify_init(void);

inotify_init() has no flags argument. A variant with a flags parameter was added later to the API: inotify_init1().

After creating an inotify instance, the files and events of interest are registered inotify_add_watch().

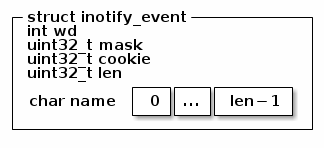
File notifications are consumed with a call to read() that fills one or several inotify_event structures. Be careful: the size of inotify events depend on the length of their name attribute.

struct inotify_event layout

Thus, the loop to iterate over inotify events obtained with read() must take into account the varying length of the event's name:

#define INOTIFY_BUF_LEN (16 * (sizeof(struct inotify_event) + NAME_MAX + 1))

nr = read(inotify_fd, buf, INOTIFY_BUF_LEN);
for (p = buf; p < buf + nr; ) {
    event = (struct inotify_event*) p;
    p += sizeof(struct inotify_event) + event->len; /* Set p to the next event. */

    handle_event(event);
}

One file descriptor to rule them all: epoll

The epoll API allows to multiplex several sources of notifications delivered with file descriptors in a single event loop.

Unsurprisingly, a file descriptor must be created -- this time with epoll_create1()1 to create an "epoll instance". Then, the file descriptors to monitor must be registered with epoll_ctl(). A struct epoll_event that describes the event must be passed to epoll_ctl().

After that, a call to epoll_wait() waits for events on the epoll file descriptor. On return, epoll_wait() fills one or several epoll_event structures. The data.fd attribute in epoll_event indicates which file descriptor is ready.

The following snippet shows how multiple file descriptors can be monitored in a single event loop:

/* Print "Beep!" every second and the number of signals that are received. */
/* Send `kill -9` to stop this program. */
#include <inttypes.h>
#include <signal.h>
#include <stdio.h>
#include <sys/epoll.h>
#include <sys/timerfd.h>
#include <sys/signalfd.h>
#include <unistd.h>

int main(void)
{
    int efd, sfd, tfd;
    struct itimerspec timer = {
        .it_interval = {1, 0},  /* 1 second */
        .it_value    = {1, 0},
    };
    uint64_t count;
    sigset_t sigmask;
    struct signalfd_siginfo siginfo;
#define MAX_EVENTS 2
    struct epoll_event ev, events[MAX_EVENTS];
    ssize_t nr_events;
    size_t i;

    /* No error checking! */
    tfd = timerfd_create(CLOCK_MONOTONIC, 0);
    timerfd_settime(tfd, 0, &timer, NULL);

    sigfillset(&sigmask);
    sigprocmask(SIG_BLOCK, &sigmask, NULL);
    sfd = signalfd(-1, &sigmask, 0);

    efd = epoll_create1(0);

    ev.events = EPOLLIN;
    ev.data.fd = tfd;
    epoll_ctl(efd, EPOLL_CTL_ADD, tfd, &ev);

    ev.events = EPOLLIN;
    ev.data.fd = sfd;
    epoll_ctl(efd, EPOLL_CTL_ADD, sfd, &ev);

    for (;;) {
        nr_events = epoll_wait(efd, events, MAX_EVENTS, -1);
        for (i = 0; i < nr_events; i++) {
            if (events[i].data.fd == tfd) {
                read(tfd, &count, sizeof(count));
                printf("Beep!\n");
            } else if (events[i].data.fd == sfd) {
                read(sfd, &siginfo, sizeof(siginfo));
                printf("Received signal number %d\n", siginfo.ssi_signo);
            }
        }
    }
    return 0;
}
Anna Fasshauer, Happy Humphrey, Jardin des Tuileries during FIAC 2015

Two file descriptors multiplexed with epoll?!
Anna Fasshauer, Happy Humphrey, Jardin des Tuileries during FIAC 2015


  1. It is more elegant to use epoll_create1() rather than epoll_create() because the latter has a confusing prototype with a size argument which is unused but must be set to a value greater than 0. 

Restore the Flame's software after a failed upgrade

I own a Flame developer reference phone that runs Firefox OS and have been playing with it for a couple of weeks. The Flame is a fully unlocked device: you have access to the bootloader and can change the firmware. Unfortunately, like me, you may fail to flash the firmware. But as we will see, you can still recover your phone.

Fastboot to the rescue

I tried to upgrade my Flame device to a newer version but the upgrade failed for an unknown reason. Even worse, my phone did not boot correctly after the failed upgrade: it was blocked after the "animated fox" appeared on screen. Thus I could not even use my Flame to phone...

In such a situation, the solution is to boot the Flame in fastboot mode. For that, you have to press the right combination of keys to instruct the bootloader to enter fastboot mode. For the Flame, you should press power and volume down at the same time.

Power + volume down

After pressing power + volume down, your Flame device should boot and display the "Thundersoft" red logo. Plug your phone to your computer with the USB cable and invoke the fastboot utility in a terminal emulator:

$ fastboot devices
1da25746        fastboot

Great! Your device has entered fastboot mode and is ready to be flashed with the original Firefox OS firmware.

Flashing the original Flame firmware

The procedure to flash the original Flame firmware is described in updating your Flame's software. Download the base image named v123.zip v18D_nightly_v5.zip (Update march 2019: the URLs of the base images mentioned in the documentation are dead, but several Firefox OS enthusiasts keep sharing base images) and decompress it. The archive contains a shell script called flash.sh that you will need to edit. I commented out some lines in order to skip the instructions executed before fastboot devices.

# adb kill-server
# adb devices
# adb reboot bootloader
fastboot devices

After running the script, my Flame phone was fully restored and I could enjoy it again (and even use it as a phone)!

César, Le Pouce, Fondation Cartier

Thumbs-up for a Firefox OS user who restored his phone!
César, Le Pouce, Fondation Cartier